
Swift package creation
Context
My iOS app Photo Club Hub) and macOS app (Photo Club Hub HTML) are, as the names suggest, closely related. They also share lots of Swift code.
The two apps are managed in two separate GitHub repositories rather than two targets in the same repository. Having separate repositories spares contributors unnecessary complexity when working on either app: if you want to fix or extend the iOS app, you can ignore the macOS app.
It would, however, be better to factor out the shared code into a Swift package that contains the common code. At the time of writing, the shared code is already organized into a subdirectory that is included in both apps. But this means that changes to the shared code still need to be manually synchronized. That clearly needs improvement.
Youtube
Packages (a.k.a. libraries) are a way to organize code that can be shared across projects or repositories.
This post is a summary of the steps mentioned in the Youtube video Creating a Swift Package in Xcode by Stewart Lynch. Note that the video is from March 2021, so it may not use the latest features of the Swift Package Manager.
Lynch’s video more or less follows the approach in Apple’s WWDC 2019 tutorial. In particular both start off making a local package within a project, and then convert it to a remote package for standalone hosting on Github.
Note that Apple’s WWDC 2019 video does not cover include resource files in a package – that was introduced in WWDC 2020.
Simplifications
My summary assumes a simplifications compared to Lynch’s video. The assemblies / simplifications are:
- you have a working GitHub account for distributing your package
- Xcode already knows about this GitHub account 📽
- you want to include the package inside the main project
- that you have a general plan which .swift files you want to put into the package
- that you don’t need to include resource files (like assets) into the package 📽
The items labelled with 📽 are covered in Lynch’s video in case you do need them.
Steps/ingredients
- choose a name for the package. In my case Photo Club Hub Data.
- file > new > Swift Package, and place the local package it in the root group of your existing Xcode project (probably of your main app). In Lynch’s video a second app using the new package is created after making the package.
- edit the package.swift manifest file:
- platforms: [ .iOS(.v17), .macOS(.v10_15) ] if you need to limit the versions of platforms. Packages are multi-platform, so the above example would allow the package to be used on any version of .watchOS without explicit version requirements.
- the default is having 2 targets: the package and an extra one for tests/testing.
Xcode will typically fill these in automatically.
- ensure that entry points of package (e.g. a struct) are made public
- This is what the public privilege level is intended for: usage outside current project.
- Public structs need explicit initializers – you can’t use memberwise initializers here.
The WWDC 2019 video shows this, but doesn’t point out this is essential.
- add import <mypackage> to files that access the package.
This is no different from importing any Apple or third party package. - create local git repository for the package
- associate package to a new remote on GitHub
- add a tag to give the package a version number (for including proper versions)
- when pushing the package, be sure to include tag(s) to handle version control at the package level
- add documentation to the public interfaces using /// style comments
- this allows the Xcode quick help feature to show the API documentation
Example: scoping of my package
Both of my apps use Core Data for persistence. The persistence is fundamentally used as a kind of cache: the data in the database gets updated (in background) by retrieving JSON files over the netword.
- The iOS app allows users to browse the data using a user interface build with SwiftUI user interface. The UI uses WebKit as an embedded browser for some of the UI.
- The macOS app has a a more basic user interface (also SwiftUI) to browse the data. The WebKit part is omitted. Instead it has a feature to generate a static website that renders the JSON data. The static website (generated locally) uses Paul Hudson’s Ignite package.
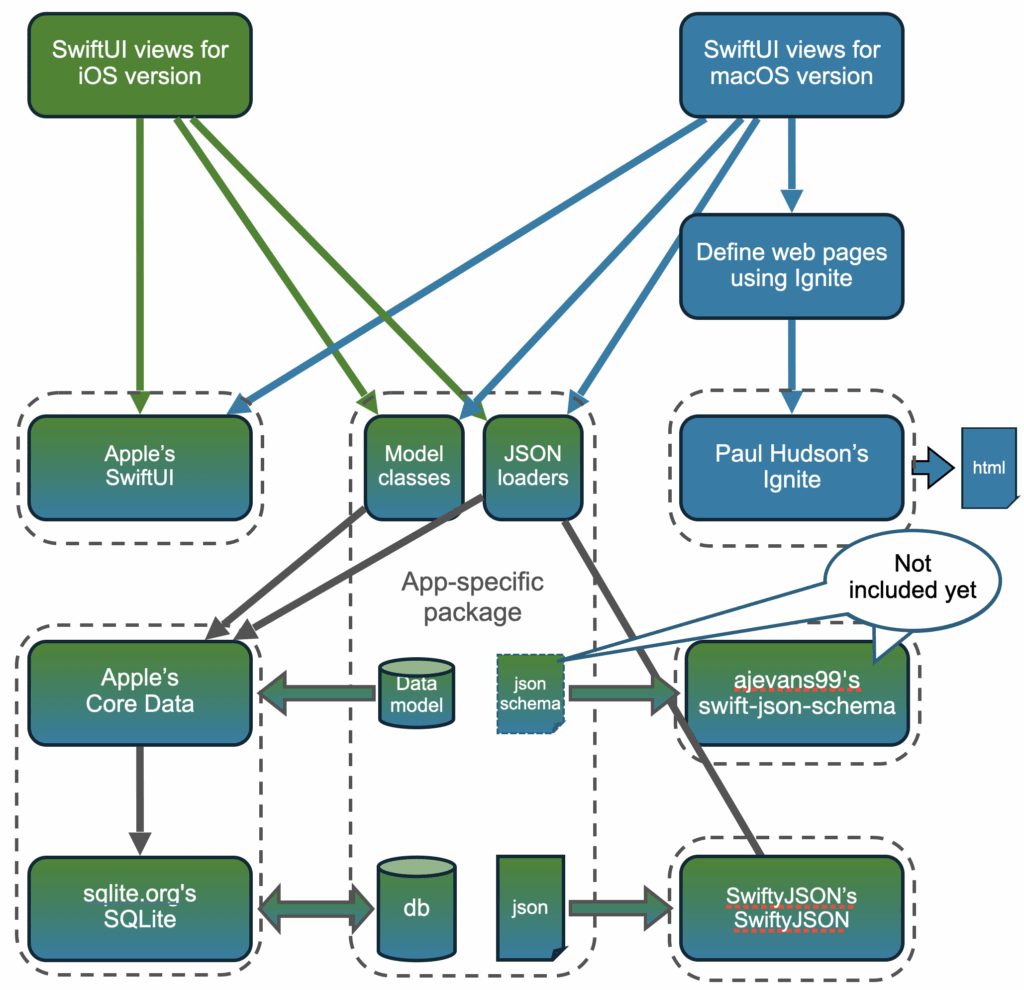
Package content
So in my case, the envisaged package contains:
- the data model of the Core Data database (implemented using SQLite)
- classes (e.g. “Photographer”, “Organization”) to access the Core Data information
- functionality to asynchronously add/merge JSON data files to the Core Data database
Comparison to frontend/backend
So essentially the package makes the data available to the apps, regardless of what apps do with the data. Compared to web apps with their backend (database and server-side functionality) and frontend (user interface running on client devices), the package does the backend functionality, but its logic is included into the apps as a library/package. While the actual database is a distributed collection of JSON files.
Core Data versus Swift Data
Ultimately it would be nice if the package doesn’t just contain the shared code but would isolate the apps from the fact that Core Data (as opposed to Swift Data) is used. This would confine the transition from Core Data to Swift Data to internals of the package or to switching over to an alternative interface-compatible package. This is a bit tricky as Swift Data is (more or less) a wrapper around Core Data rather than being an independent successor.
This hiding of the storage technology could alternatively be implemented (package wise) as:
- A new Swift Data version of the storage package, that replaces the original Core Data one.
If the Swift Data version is backwards compatible with the Core Data version, why not push users to over? - Two different packages that have the same API. Gives a user control, but means double maintenance and testing.
- One package that allows you (during init()?) to select which technology to use.
Gives a user control, but still requires double maintenance and testing.